How To Tie The Walt's Worm & Sexy Walt's Worm
The Walt’s worm is one of my most productive flies in my fly box and has been for many years. What’s even more profound is it’s nothing more than dubbing on a hook. Who knew that this fly would become such a staple in many anglers’ fly boxes across the country. This fly originated in central PA and was created by Walt Young many decades ago. I had the honor to meet Walt at the Lancaster Fly Fishing Show back in 2017. Since that encounter, my curiosity and confidence in the Walt’s worm has soared to new heights, even to the point of fishing two of the same pattern in different hook and bead sizes and/or fishing two different colored dubbed bodies at the same time. By changing the size of the hook and bead, and changing the color of dubbing of the body, you can fill an entire fly box of this tasty little nugget and start your trout season off on the right foot. I think this pattern is effective for many reasons. The first is that it resembles a lot of staple food sources for trout. It can imitate a cress bug, caddis larva, or cranefly larva for starters. Secondly, it has a very buggy look which is enticing to hungry trout. The rabbit dubbed body with spikey guard hairs adds movement to the fly, while the subtle Antron flash piques the trout’s interest. Finally, it is very easy to tie and requires very little time at the vice, so anglers are eager to fish them deep and not so worried about losing them to the bottom of the stream. We are going to be tying two versions of the Walt’s worm in this tutorial. The original Walt’s worm (Walt Young) and the Sexy Walt’s worm, a flashier variation created by Loren Williams which has become a staple in many competitive fly anglers’ boxes. Thanks for joining along. Let’s get to tying the flies.
Materials list:
Walt's Worm
Hook: Fullingmill Jig Force 5045, size 18 or TCO-C660BL, size 18
Bead: Slotted Tungsten Bead, 7/64 or 2.8mm - Copper
Body: SLF Squirrel Spikey Dubbing, Natural Fox or Hare's Ear Plus Dub, Hare's Ear
Thread: UNI 8/0, Olive Dun
Sexy Walt's Worm
Hook: Fullingmill Jig Force 5045, size 18 or TCO-C660BL, size 18
Bead: Slotted Tungsten Bead, 7/64 or 2.8mm - Silver
Body: SLF Squirrel Spikey Dubbing, Natural Fox or Hare's Ear Plus Dub, Hare's Ear
Thread: Veevus 10/0 - Fl. Orange
Flash: Micro Flashabou Opal Mirage
How to Tie a Walt’s Worm (Original)
Step 1:
Secure the bead onto the hook small hole first and place securely into the vice of your choice. Here, I am using a Fulling Mill Jig Force hook in size 18 paired with a 2.8mm slotted tungsten bead in copper.

Step 2:
Secure your thread to the hook by making a couple of jam wraps directly behind the bead. Here I am using Uni 8/0 thread in Olive Dun but any thin tan or brown thread will work just fine for this pattern. The goal is to use thin thread to keep the body relatively thin. Clip the excess thread.

Step 3:
Build a taper with your thread so that you have a smooth body transitioning from thin at the back end of the fly to thicker towards the bead as shown. When you finish building a taper, leave your thread hanging at about the hook barb (The hook I’m using is a barbless hook).

Step 4:
Grab a pinch of dubbing from your favorite dubbing of choice. (NOTE: The best dubbing to use for a Walt’s worm is a rabbit fur/Antron blend such as Hare’s Ear plus #1 from Hareline. Regular hare’s ear dubbing works as well as SLF Spikey Squirrel dubbing in Natural Fox. Here, I am using a rabbit fur/Antron blend. You can also blend your own dubbing by trimming the fur off of a hare’s mask and mixing it with Antron to produce your own custom dubbing blend. Make a thin dubbing noodle a couple of inches long and proceed to wrap the noodle with touching turns up the hook shank to right behind the bead. Because we already built the taper with our thread, your body should be tapered as shown.


Step 5:
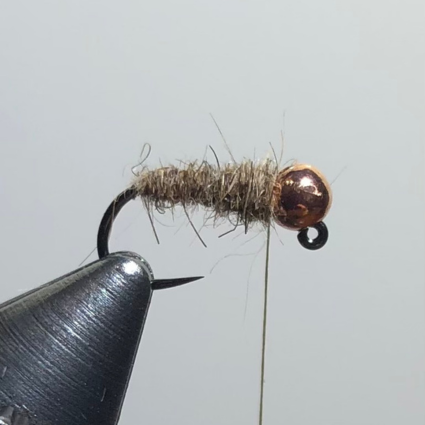
Whip finish the fly. For all of my Walt’s worms, I like to do a double whip finish for extra durability. Once finished, trim the excess thread free. I will usually trim the overly long guard hairs with scissors but generally like to leave the body as buggy looking as possible. You have completed the first fly. It’s that simple!
How to Tie a Sexy Walt’s Worm
Step 1:
Secure the bead onto the hook small hole first and place securely into the vice of your choice. Here, I am using a Fulling Mill Jig Force hook in size 18 paired with a 2.8mm slotted tungsten bead in silver.

Step 2:
Secure your thread to the hook by making a couple of jam wraps directly behind the bead. Here I am using Veevus 10/0 in Fl. Orange. This will be used to not only form the fly but also create the hot spot directly behind the bead. The goal is to use thinner thread to keep the body relatively thin. Clip the excess thread.

Step 3:
Grab a piece of flash material of your choice and secure on the near side of the hook. Here I am using a piece of opal mirage micro flashabou. Secure the flash all the way back to just shy of the bend of the hook.
Step 4:
Build a taper with your thread so that you have a smooth body transitioning from thin at the back end of the fly to thicker towards the bead as shown. When you finish building a taper, leave your thread hanging at about the hook barb (The hook I’m using is a barbless hook).

Step 5:
Grab a pinch of dubbing from your favorite dubbing of choice. (NOTE: The best dubbing to use for a Sexy Walt’s worm is Hare’s Ear plus #1, SLF Spikey Squirrel dubbing in Natural Fox, or a rabbit fur/Antron blend). Again, I am going to be using a rabbit fur/Antron blend. Make a thin dubbing noodle a couple of inches long and proceed to wrap the noodle with touching turns up the hook shank to right behind the bead. Because we already built the taper with our thread, your body should be tapered as shown.


Step 6:
Grab your piece of flash and begin to counter wrap it up the hook shank with open spiral wraps towards the bead. Make sure that when you wrap, the first wrap goes underneath the hook shank. This will give the flash more protection and make your fly more durable. On this size hook, you should get about four evenly spaced wraps. When you reach the bead, secure the flash with a few tight turns of thread, and trim the excess free.

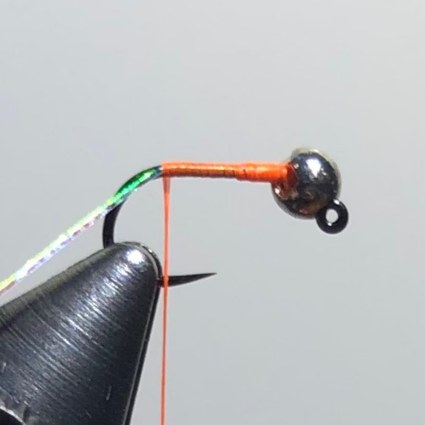
Step 7:
Take a couple of extra thread wraps to produce a nice hot spot of orange thread behind the bead. Once complete, whip finish the fly. For all my Sexy Walt’s worms, I like to do a double whip finish for extra durability. Once finished, trim the excess thread free. I will usually trim the overly long guard hairs with scissors but generally like to leave the body as buggy looking as possible. You have completed the second fly. Again, very simple, but very deadly!

Thanks for following along with this month’s fly-tying tutorial. I hope this fly treats you just as well as it’s treating me! Tight lines.

Jacob Gilliland works in the TCO - Boiling Springs shop and is a fly fishing guide for Relentless Fly Fishing. To find out more about Jacob, check out his TCO Fly Fishing bio and his Relentless Fly Fishing bio.
Call TCO at 717-609-0169, ext 5 to book a trip, or contact Jacob via email: Jacob@tcoflyfishing.com.
Comments
Leave a comment