What's Jacob Tying - Olive Hot Spot Shrimp
Olive Hot Spot Shrimp
The olive hot spot shrimp is one of my most productive flies and one of my absolute favorite patterns to tie. It’s easy, effective, and quite durable. I fish this fly year round, but I find this pattern especially effective in the winter time. Between the months of December and March, this fly is a must have on spring creeks and tailwaters. For me, it's hard to beat a size 14. It’s the size that I’m most confident in and the size that catches the most fish, however it can be fished effectively in sizes 12-18. In addition to the olive shrimp with orange hot spot, I tie a UV tan and dead orange variation to imitate molting and dying/dead shrimp respectively. The orange spot on the olive shrimp imitates a pregnant female and this I believe is the trigger that initiates strikes from the trout. On my local fisheries such as the Yellow Breeches Creek, Big Spring Creek, and Letort Spring Creek, shrimp and other crustaceans are an important food source to trout that are available to them all year round. I never leave home without several imitations of shrimp, but the olive with orange hot spot is a must have in every fly tyers box!

Materials List:
Hook: Tiemco 2457 #14 or Tiemco 2499SP-BL #14
Bead: 7/64” Mottled Olive Plummeting Tungsten Bead
Weight: .015 Lead wire
Thread: Veevus 12/0 - Olive or Light Olive
Ribbing: Ultra Wire - Small Olive or Brown
Backing: Thin Skin Fly Specks - Tan/Black or Sow-Scud Back 1/8" Olive
Tail/Antennae: Sow-Scud Dubbing - Smokey Olive
Body: Sow-Scud Dubbing - Smokey Olive
Hot Spot: Sow-Scud Dubbing - Bighorn Orange
Tools:
1. Renzetti Cam Traveler 2000 Series Vice
2. Rite Standard Bobbin
3. Dr Slick All Purpose Tying Scissors
4. Loon Ergo Whip Finisher
5. Loon Ergo Dubbing Brush
Step #1: Place hook in vice and secure the bead. Place the hook (Tiemco 2457 #14 OR hook of your choice) in the vice and secure the bead (7/64” plummeting tungsten mottled olive OR bead of your choice) onto the hook small hole first. It helps to rotate the hook upside down in the vice, so the hook point is facing up.
Step #2: Add lead wire. Take 7 wraps of .015 lead wire around the hook shank and shove the wire up through the back end of the bead. This will help to add additional weight, center/stabilize the bead, and help with the overall taper of the pattern.


Step #3: Thread the hook. Secure the thread onto the hook shank directly behind the lead wraps. Take wraps of thread until the thread build up is even with the lead wraps (This prevents the lead from sliding backwards on the hook). Cover the lead completely and move your tying thread back towards the starting point, creating a gentle thread ramp behind the lead. Clip off your excess tag of thread.


Step #4: Tie in the tail/antennae. Take a small pinch of dubbing and secure it to the hook right at the base of the thread ramp behind the lead wraps. Work the dubbing back towards the hook bend all the way to just beyond the hook barb. (If you choose to crimp your barb, stop your thread where the barb would normally be).

Step #5: Cut the tail to length. The tail length should be about the width of the hook gap. Pro tip: Don’t use the tips of your scissors to trim the dubbing. Synthetic fibers will dull the blades.

Step #6: Tie in the ribbing. Secure a piece of wire (UTC ultra wire-small olive OR wire of your choice) to the hook shank. Tie the wire in on the far side of the hook shank. Work your thread down to the base of the tail and then back up to the base of the lead wraps.

Step #7: Tie in the casing. Tie in a piece of thin skin (fly specks-tan/black OR casing of your choice) at the base of the lead wraps and secure it all the way down to the base of the tail/antennae. The width of the thin skin should be cut to ½ to ¾ of the hook gap.

Step #8: Start dubbing the body. Create a thin, slightly tapered dubbing noodle on the thread using the same dubbing that was used to create the tail/antennae (Wapsi Sow/Scud-Smokey Olive OR dubbing of your choice). Dub the body by working the noodle from the base of the tail to about the hook point. Pro tip: Apply the dubbing loose so that it is easier to pick out the legs in a later step.


Step #9: Dub a hot spot. Take a small pinch of dubbing (Wapsi Sow/Scud-Bighorn Orange OR dubbing of your choice) and make a short slender noodle on your tying thread. Dub a hotspot directly above the hook point.


Step #10: Finish dubbing the body. Take another pinch of smokey olive dubbing and make another dubbing noodle on your tying thread. Continue dubbing the body from the hotspot all the way up to just behind the bead. Make sure to leave a little room to tie in the thin skin and the wire.


Step #11: Pull the casing over the body. Pull the thin skin up and over the body and secure with a couple wraps of thread. Two material locking wraps in front and behind should be enough to hold it in place.


Step #12: Trim the excess thin skin off. Cut the thin skin off at an angle to eliminate bulk. Take another thread wrap or two to further secure the casing.

Step #13: Bring the wire forward. Segment the body by wrapping the wire forward with open spiral, evenly spaced wraps. On a size 14, you should be able to get 6-7 segments. Helicopter the excess wire off.

Step #14: Whip finish the fly. After doing a 4-5 turn whip finish, cut your thread close.

Step #15: Brush out dubbing for legs. With a dubbing brush, tease out the dubbing in the body to create legs. If you dubbed the body loose, this is an easy step. Be careful not to nick the exposed thread wraps by the bead. Before this step, it is always a clever idea to reinforce the wraps with superglue, head cement, or UV resin of your choice.


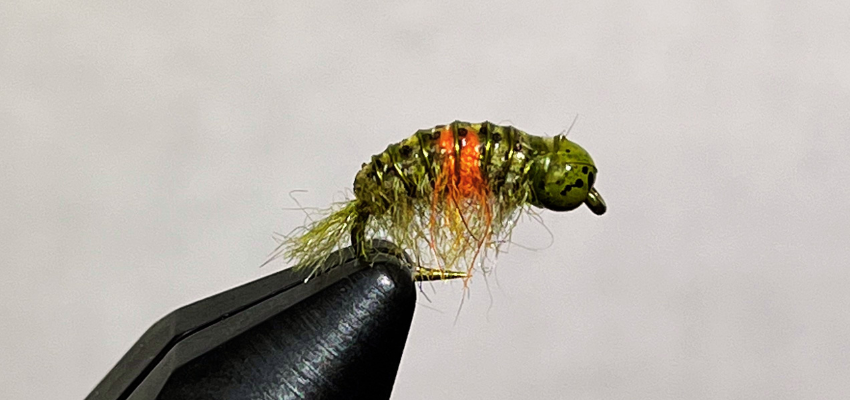
Your fly is now complete and should look something like this: 

Thank you for reading my first fly tying blog. Please feel free to leave any questions in the comments below. Check back next month for another Shrimp pattern!

Jacob Gilliland works in the TCO - Boiling Springs shop and is a fly fishing guide for Relentless Fly Fishing. To find out more about Jacob, check out his TCO Fly Fishing bio and his Relentless Fly Fishing bio.
Call TCO at 717-609-0169, ext 5 to book a trip, or contact Jacob via email: Jacob@tcoflyfishing.com.
Comments
Leave a comment